
Content
Click on a chapter to go there directly:
- Introduction
- Preparation and installation
- Getting started
- Tips for optimal app operation
- Share your experience
1. Introduction
In this instruction you will find the information needed to try out eZwayZ app. We explain step by step how to install and use the app.
1.1 About the eZwayZ app
With this app, you can easily find your way around indoor spaces. You do this by following the indicated route to your destination on your mobile phone. The app guides you with clear instructions. You choose which form of route guidance you want to receive while walking the route. This can be visual, tactile (vibrations) or spoken instructions or sound effects.
1.2 Important safety information
Before using the app, please read these instructions carefully. The app is not a replacement for your orientation and mobility skills but intended as an additional aid. It is not a replacement for e.g. a white cane, guide dog or primary mobility aid. It is important for your personal safety to be aware of your surroundings at all times while using the app. Of course, you can also go out with someone.
By using the app, you agree that using the eZwayZ app is at your own risk.
2. Preparation and installation
2.1 Suitable iPhone and internet connection
The eZwayZ app currently only works on an iOS device (iPhone or iPad). We recommend at least an iPhone 8 or newer for the app to work properly. The app needs an internet connection so make sure you are connected to a wifi network or enable your mobile internet.
2.2.1 Installation via direct link
- Click on the direct link to the eZwayZ App in the Appstore https://apps.apple.com/nl/app/ezwayz-easy-wayz/id1593683332
- Install eZwayZ by clicking the download icon.
2.2.2. Installation via the Apple App Store
- Open the App Store app on your iPhone.
- Tap the 'search' option at the right bottom, type eZwayZ in the search field and click search.
- Install eZwayZ by clicking the download icon.
2.3 Opening eZwayZ for the first time
Open eZwayZ for the first time by clicking Open.
You have to approve some screens and settings before you can use the app. You will see these only once.
2.3.1 Step-by-step opening eZwayZ for the first time
- Immediately after opening the app, a screen comes up with information about the app. At the bottom of the screen, click the 'next' button to continue.
- A screen will then follow with a warning text. This text is about the disclaimer of warranty and limitation of liability for the eZwayZ app.
- Read this text carefully and, if you agree, toggle the toggle button at the bottom of the page. Only when you agree to the terms of use, the 'continue' button becomes active.
2.4 Selecting a location
You can use eZwayZ without creating an account. Registration does offer some additional features such as saving favourites. There are several locations available where you can navigate with the app. First select the right location. If you are using the app for the first time, it asks permission to use your location. Then choose the 'when using the app' option.
2.4.1 Step-by-step Selecting a location
- Tap the 'use without account' button with your finger.
- In the new screen, tap the 'select location' search field.
- Choose the desired location from the list by tapping it.
- Tap the 'send' button.
- A screen will appear saying 'request pending'.
- Then a screen appears saying that the application has been approved. If the application is not approved, something has gone wrong. Please try again. If it still fails, contact us: welcome@atsence.nl.
- Tap the 'continue' button at the bottom of the screen.
2.5 Quick start eZwayZ
When you open the eZwayZ app for the first time, you will - immediately after selecting the location - get a short introduction. A number of 'cards' with information tell you how to use the eZwayZ app. Want to watch the introduction again later? Then go to Settings and choose 'Quick start'.
For a more comprehensive version of the Quick start, you can open the Tutorial in the app. To do so, go to Settings and choose 'Tutorial'.
For the most comprehensive instruction, follow this tutorial. The tutorial can also be found in the App. For this, go to Settings and choose 'Tutorial'.
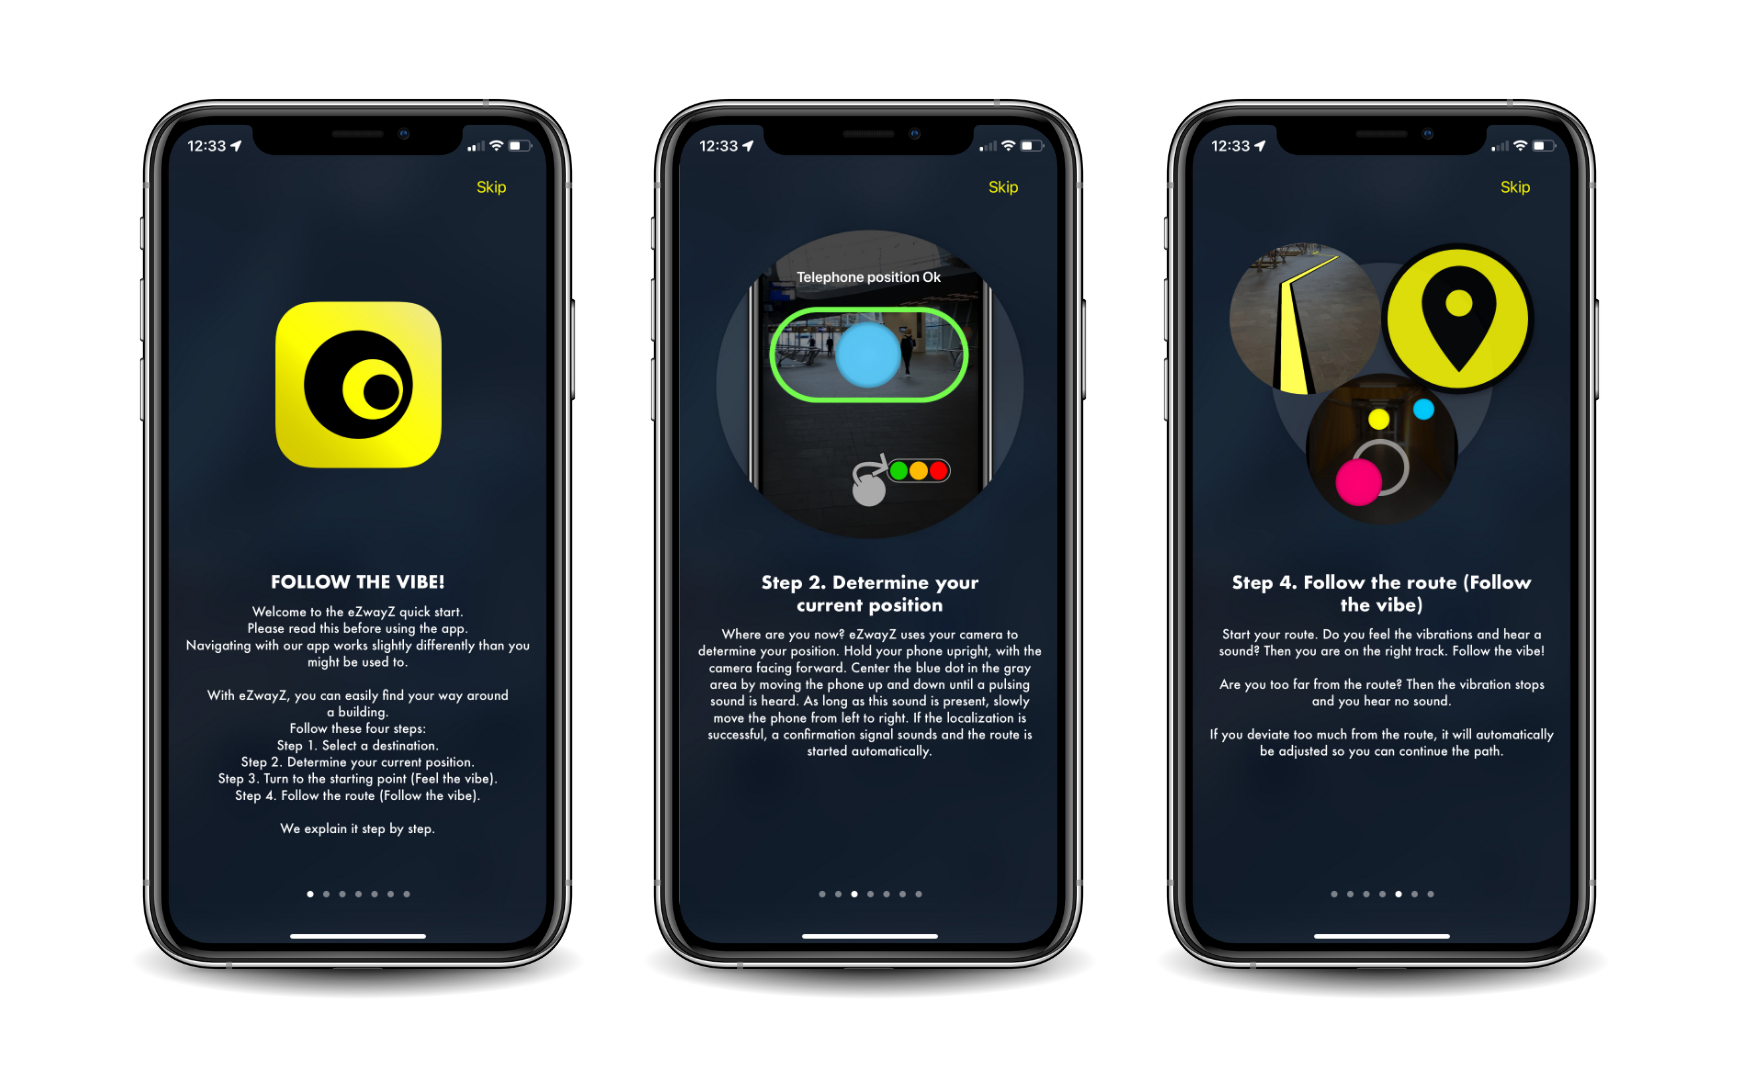
Image Quick start
2.6 Saving to favourites
You can already select destinations at a location at home and save them to your favourites. When you are at the location, you then only need to click on GA and not search again.
- Create an account
- Go to search, tap the favourites star at the top right
- Tap the plus sign in the search bar and find your desired destination.
- Add to favourites by tapping the plus sign next to the destination and then save.
- Repeat steps 3 and 4 to add more favourites.
3. Getting started with the app
Once you have started eZwayZ, the navigation can begin.
You always follow four steps:
- Where do you want to go? Select a destination
- Where are you now? Determine your position
- Feel the vibe. Turn to starting point
- Follow the vibe. Start walking
3.1 Starting the app
From this point in the instructions, it is necessary that you are logged into eZwayZ and that you have chosen the right location. Is that not yet the case? Then first follow the steps chapter 2 ‘Preparation’.

App-icon eZwayZ
Tap the application icon to launch the app. The app is now ready to use, now continue at 3.2.
3.2 Where do you want to go? Select a destination
In the destinations screen, you will find all destinations available in the selected location. If you tap a category, the app shows all destinations in this category. For example, at Arnhem Centraal train station, under the category 'information & tickets' you will find the destinations 'NS ticket machine', 'OV information desk' etc.
At public transport locations, eZwayZ has an extra tab called 'OV' (to the left of the destinations tab). Through this tab, you can find a route to the departure point of your desired bus, train or metro.
In both the OV screen and the destinations screen, it is possible to search directly for a destination via the search bar. The search bar is at the top of the screen. The search results appear in a list below the search bar.
3.2.1 Step-by-step Select a destination
- Search the list for the category you think the destination falls under.
- Have you found your destination? Click on it with your finger.
- The app will now automatically determine your position.
3.3 Where are you? Determine your position
While determining your position, the app takes a number of pictures of the immediate surroundings to determine where you are. When you use the app for the first time, a pop-up appears: you need to give permission to use your phone's camera. Tap 'ok'. Without access to your phone's camera, the app will not work. Follow the instructions below to determine your position.
3.3.1 Step-by-step Where are you?
Additional guidance with vibration and sound through the Non Visual Navigation Profile
The following "Where are you now?" steps are especially suitable for people who can still somewhat see the pictures below. If this is not the case, we recommend using the Experiential Non-Visual Navigation Profile. This profile guides the where am I process with vibrations and sounds. To turn this profile on, go to Settings and choose 'Non-visual'.
Where are you?
- The app asks you to hold your phone up. If you hold your phone too high, you will get the message 'hold down'.
- Hold the phone vertically and upright, and point the camera on the back of your phone, forward. This allows the camera to explore its surroundings.
- When using the Non Visual Navigation profile, the phone starts vibrating. - An oval shape appears in the location screen, with a grey border. You hold the phone right when the blue circle is in the centre of the oval, the edge of the oval will turn green and you will get the message 'Phone position OK' after which you will hear a pulsing 'scan sound'.
- When using the Non Visual Navigation profile, the vibration will increase as the blue circle moves towards the centre of the oval, when the vibration is at maximum, the camera position is optimal. - During the scan sound, slowly move the camera from left to right, this is how the camera scans the surroundings. When the scanning of the environment is successful and the position is determined, you will hear a "success sound", the pulsing scan sound stops and the status light at the bottom of the screen turns green to indicate successful localisation. The phone now knows where you are.
- When using the Non Visual Navigation profile, slowly move the phone from left to right while it vibrates at maximum. This may feel contradictory but maximum vibration is so ok!
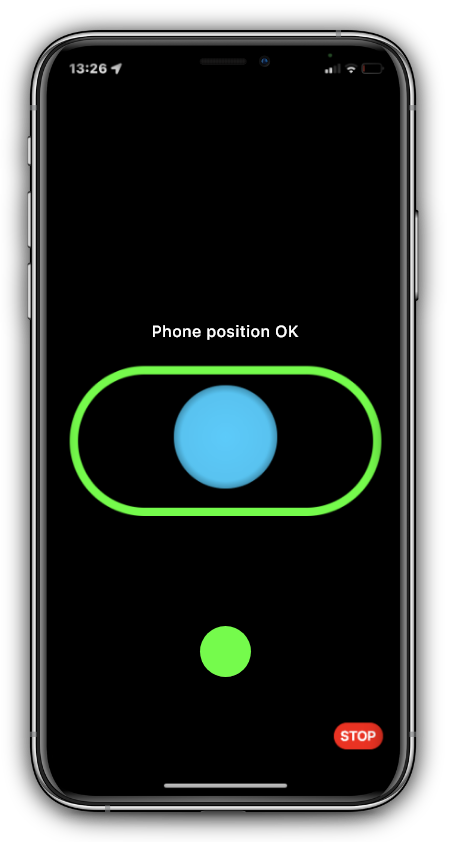
Image scanning screen and phone position
- Should the localisation fail, make two to three steps towards an open space and try again. If the localisation takes too long, a pop-up will appear with the same message, and you can try again. Should the problem persist and you fail to localise, follow the tips in chapter 4.
- When your position is determined, a short beep sounds, the status light is green and the route is determined.
3.4 Feel the vibe! Turn to starting point
A yellow dot has appeared on your screen. Slowly rotate on your axis towards the yellow dot - until you feel the app vibrate and hear a sound. FEEL THE VIBE! You are now facing the right direction. You are ready to walk to your destination.
3.5 Follow the vibe! Start walking
Start walking your route. FOLLOW THE VIBE! As long as you feel the vibrations as well as hear the pulsating sound, you are walking in the right direction.
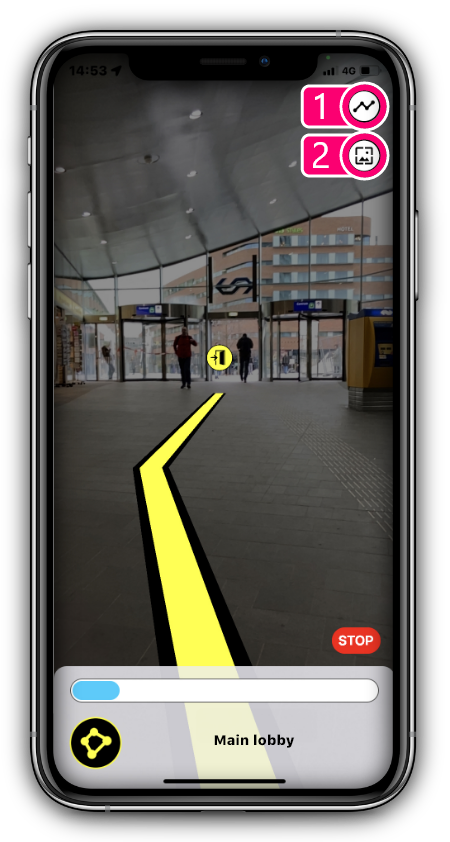
You can simultaneously follow the route visually and via (spoken) audio messages. On the navigation screen, you see the (camera) image of your surroundings. At the bottom, it shows (in text) your current location. You also see a progress bar showing how far you are. You can stop the route with the red stop button (top right of the progress bar).
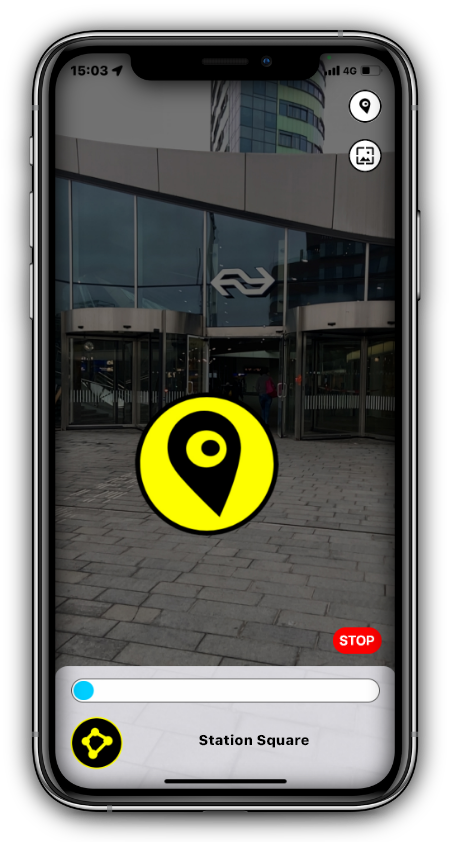
Image Navigation screen with waypoint-display
By default, the app shows the route with so-called waypoints. You walk the route from point to point.
You can also follow the route via a yellow line. How to set that is explained in paragraph 3.4.3.
Before adjusting the settings, we recommend testing the app with the default settings.
A waypoint is indicated by a black-bordered, yellow circle with a black location icon inside.
If you don't see a waypoint for a while, there is a waypoint indicator on the screen: a yellow dot. Turn in the direction of the yellow dot to continue your route.
3.5.1 Step-by-step Follow the vibe!
- Find the starting point of the route, this can be done in 3 ways:
- Visually: By following the start indicator (yellow dot on the screen). Turn slowly around your axis in the direction of the yellow dot while pointing the phone's camera forward. If you point in the right direction, you will see the starting point of the route line on the screen.
- Audio signals: The app speaks out where the start point of the route is. Turn slowly on your axis while pointing the phone's camera forward. When you point in the right direction, you will hear a bleeping sound. Now you are in the direction you need to walk.
- Vibrate: Gently turn on your axis while pointing the phone's camera forward. When you point in the right direction, you feel a pulsating vibration. Now you are standing in the direction you need to walk to.
- Follow the route to your destination:
- Follow the route line on screen.
- Follow the spoken route instructions.
- Follow the audio signals to walk in the right direction.
- You hear a bleeping sound when you walk in the right direction
- You won't hear any sound when you walk in the wrong direction.
- Follow the vibrations to walk in the right direction.
- You feel a pulsating vibration when you walk in the right direction.
- You feel no vibration when you walk in the wrong direction.
- Walk the route to the end. The app tells you where your destination is 5 metres before you get there. eZwayZ lets you know that you have reached your destination in various ways
- Visual: A new screen appears on the screen with the destination icon, the text 'Destination reached' and below it the name of the destination.
- Auditory: A sound is played.
- Auditory: A voice tells you that you have reached your destination and which one it is.
- There are three buttons at the bottom of the destination reached screen. Tap the 'to main menu' button if you want to stop navigating or navigate to a new destination.
-
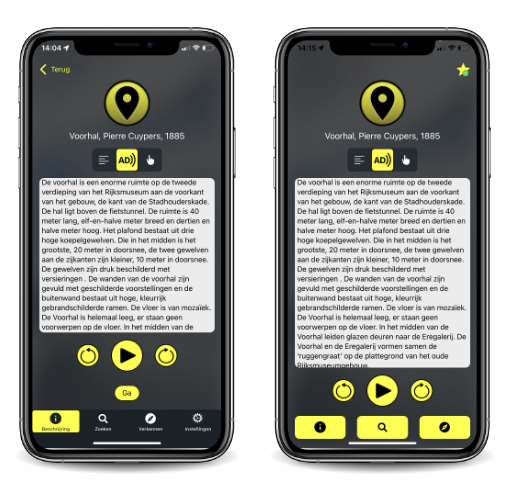
If there is an additional "Description" tab in the app, additional object information is available at this location. You can view the property information in two ways:
A. directly via the optional "Description" tab and then
B. after reaching your destination via the destination reached screen.
In both cases, a screen appears where information about the object is offered via 1 to 3 additional buttons with the following informative texts of the object:
a. general description.
b. audio description, which is extended information for people with visual impairments.
c. Instruction text, this is an optional instruction text e.g. how to use the object or if you can do a fun task here.
Choose the information you want by selecting the button and then click the "play" button. The text is now read out loud. Navigate through the text with the "previous sentence" and "next sentence" buttons.
3.5.2 Relocating while navigating
Sometimes a route doesn't run well, or you might lose it. By default, the setting ‘auto localization‘ is on. This allows you to quickly correct the path while navigating by holding the phone out in front of you, with the camera facing forward. This allows the app to recalculate your position and automatically adjust the route. You can also stop a route completely by tapping the red ‘stop‘ button in the lower right corner.
Navigation screen with route line and Change navigation view and Relocate buttons.
3.5.3 Choose your favourite visual display, route points, route line or circle navigation
By default, the app is set to route point view. If you prefer to follow a line, turn on the route point view. At the top right of the navigation screen, click the top round button 'change navigation view' (see image). This switches between route point navigation, route line view and circle navigation.
You only change the visual representation of the route with this. The vibrations, sounds and spoken instructions remain the same.
Adjust background colour of navigation screen
While navigating, you see your surroundings on the screen as registered by your phone's camera. You can make this background darker or completely black yourself. For some users, this can help to see the waypoints and route line better. The button to change the background colour is at the top right of the navigation screen directly below the 'change navigation view' button. Tapping it will darken the background. Tapping it again will turn the background completely black. Tapping it again makes the background bright again.
3.6 Favorites
Destinations you often navigate to can be manually added to your favourites after walking a route. To do so, you need to have your own eZwayZ account and also be logged in. Add destinations to your favourites using favourites management. You can find that via the star icon at the top right of the app.
3.6.1 Step-by-step adding destinations to your favourites
- Destinations can be added to your favourites after walking a route (as soon as the destination is reached) using the 'Add to favourites' button.
- Destinations can be added to your favourites manually. To do so, press the star in the destinations tab at the top right.
- Then press the + button in the Favourites screen (next to the search bar at the top) and select the desired category.
- Add the destination(s) in the category(s) by clicking the green + button. The button then turns into a red cross, allowing you to remove the added destination again.
- Once you have made your selection, click 'Save' (top right) and the destination will be added to your favourites.
- In the Favourites screen, you can delete added destinations using the 'Edit' button (top right). To delete a favourite, click on the red cross.
- Once you have finished making changes, click 'Save'.
3.7 Explore
With eZwayZ, you can also explore which destinations are in your immediate vicinity.
They are displayed in a list with the nearest destination at the top. In busy locations, with many destinations together, it is useful to adjust the range (via Settings) to make it easier to distinguish the destinations. If you are already in the explore function, you can adjust the range there too via the filter at the top right.
You can also view destinations in a 360-degree view. In this view, you rotate the phone (vertically and upright) around you and the destinations that are right in front of you appear. Here, the 360-degree view shows only the front destination that is closest. There may still be destinations behind, via the list view, these will be shown. The list view is discussed below.
3.7.1 Step-by-step exploring with verkennen with list view
- At the bottom of the screen, select the 'explore' tab.
- The app immediately starts the localisation process to determine where you are and what destinations are nearby.
- Locate yourself.
- Select a destination from the list by tapping it.
- The app starts the route to the destination.
3.7.2 Step-by-step exploring with 360-degree view
- At the bottom of the screen, select the 'explore' tab.
- The app immediately starts the localisation process to determine where you are and what destinations are nearby.
- Locate yourself.
- Tap the '360-degree view' button to activate the 360-degree view.
- Look around you with the phone.
- Every time a destination comes into view, you will hear a tap and the destination will appear as a banner at the bottom of the screen.
- Tap the go button in the banner and the app will start the route to your destination.
4. Tips for optimal app operation
The app uses your phone's camera and sensors. For the app to work optimally, you need to observe the following things:
4.1.1 Use the latest version of the eZwayZ app
- Go to the App Store on your phone.
- Check if there is an update of the eZwayZ app.
- Install the update if there is one.
4.1.2 Smartphone position during localisation
- Holding the phone in the correct position is essential for the app to work properly. Therefore, when locating (at the start of the route) and relocating (at certain times while following the route), hold your phone vertically and upright. In this position, the camera on the back of the phone faces forward (it points away from the body).
- When (re)locating, stay still. Wait to walk until the localisation is successful.
- Make sure the camera has a clear view, if it does not then the localisation process may fail, take two to three steps towards an open space and try again.
4.1.3 Localisation failed. What now?
If localisation fails, it is often due to one of the three following causes:
- The spot in the building is not known to the app. If you think this is the case, move to a more common spot such as an entrance, reception or the like and try again.
- There is insufficient light or just too much light for the camera to take good photos. Stand in a place that is well lit and where there is no excessive sunlight.
- The camera is pointing at a wall or narrow space, so the app does not recognise the location.
4.1.4 Target group
The app is made for people who are visually impaired. We are in the process of optimising the app for people who do not want to use the app visually.
People with a guide dog we want to warn that the dog might follow a different path than the app. In addition, the guide dog requires attention from its owner to be used properly and the app may affect clear communication between the dog and the owner.
5. Share your experience
We would love to hear your experiences with eZwayZ so we can further improve the app!
Send your experiences to: welcome@atsence.nl or via the app using the "Send your feedback" button in the Settings.